2026 में Google Stitch AI से design कैसे बनाएं यह सवाल अब हर उस इंसान के मन में आता है। जिसके पास कोई app idea है लेकिन Figma सीखने का time नहीं है और न ही interest। सच बताऊं तो जब मैंने पहली बार Instagram में एक reel में देखा कि text prompt लिखो और पूरी app screen बन जाती है, तो मुझे लगा यह कोई click bait है। लेकिन जब मैंने इसे खुद try किया और अपने हिसाब से इसे prompt दिया, तो १ minute में एक complete UI screen बनके मेरे सामने थी जिसमें layout, colors, buttons, सब कुछ था।
उस दिन से मैं Stitch AI regularly use कर रहा हूं और honestly यह tool उन सभी के लिए genuinely useful है।जो बिना design background के अपना idea visually देखना चाहते हैं।
इस guide में मैं share करूंगा:
- Google Stitch क्या है और यह actually कैसे काम करता है
- Google Stitch AI से design कैसे बनाएं step-by-step
- Prompt कैसे लिखें जिससे अच्छा output आए
- Vibe designing का concept practically कैसे काम करता है
- Stitch vs Figma vs Canva में से क्या choose करें
- Common mistakes जो मैंने खुद की हैं
- किसके लिए यह tool सबसे ज्यादा useful है
चलिए शुरू करते हैं!
Google Stitch AI क्या है?
Google Stitch एक AI-powered UI design tool है जिसे Google Labs ने बनाया है। यह May 2025 में Google I/O में launch हुआ था। शुरुआत में यह एक simple experiment था जो सिर्फ single UI screen generate कर सकता था।
March 2026 में Google ने इसका बड़ा update दिया। अब यह एक पूरा design workspace है जहाँ आप एक साथ 5 connected screens बना सकते हो, voice से design update कर सकते हो, और directly production-ready HTML/CSS code export कर सकते हो।
इसकी background थोड़ी interesting है। Google ने 2025 में Galileo AI को acquire किया था जो पहले से text-to-UI generation में काम कर रहा था। Google ने उसे Gemini AI के साथ combine करके Stitch बनाया। यह Gemini 3 Flash और Gemini 3.1 Pro दोनों models पर चलता है।
एक important बात जो मुझे पहले से बता देनी चाहिए — Stitch Figma को replace नहीं करेगा। दोनों का use case अलग है। Stitch उन लोगों के लिए है जिन्हें idea को quickly visual form देना है। Professional pixel-perfect design के लिए Figma अभी भी better है।
Google Antigravity vs Claude AI: मैंने दोनों से एक Restaurant Website बनवाई, Result Shocking था
Google Stitch AI से Design कैसे बनाएं (Step-by-Step Guide)
Step 1: Stitch Access करो
Google Stitch AI बिल्कुल free है। इसको use करने के लिए न कोई credit card चाहिए, और न कोई installation।
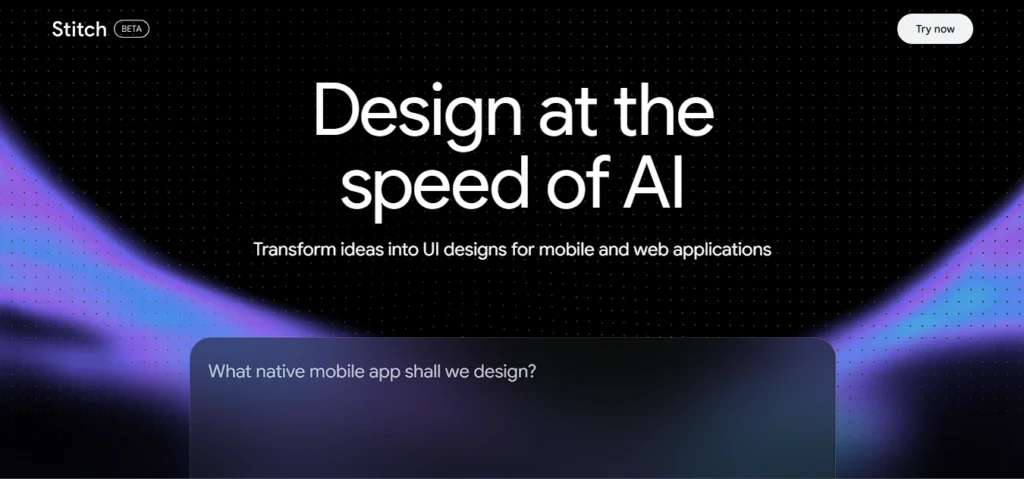
- Browser में जाओ: stitch.withgoogle.com।
- अपने Google account से sign in करो।
- एक infinite canvas open होगा जो आपका workspace है।
Stitch AI Pricing:
| Mode | AI Model | Monthly Generations |
|---|---|---|
| Standard Mode | Gemini 3 Flash | 350 |
| Experimental Mode | Gemini 3.1 Pro | 200 |
350 generations monthly individual users के लिए काफी हैं। लेकिन एक project पर बहुत ज्यादा iterate करते हो तो limit जल्दी खत्म हो सकती है। इसलिए जब design satisfying लगे तो immediately export करो।
Step 2: Prompt लिखो (यही सबसे Important Step है)
Stitch AI का पूरा output आपके prompt की quality पर depend करता है। मेरा personal experience के हिसाब से जितना detailed और specific prompt आपका होगा, उतना better result आपको मिलेगा।
Weak Prompt (जो काम नहीं करता):
Generate the design of Food Delivery Appइस prompt से जो output आएगा वो completely random होगा। आपके idea जैसा नहीं होगा।
Strong Prompt (जो काम करता है):
Design a food delivery mobile app UI with dark theme.
Home screen should have a search bar at the top, category filters below it (Pizza, Burgers, Biryani, Chinese),
restaurant cards in a grid showing rating, delivery time, and price range. Add a bottom navigation bar with Home, Search, Orders, and Profile icons.
इस prompt में theme, layout, elements, categories सब specify किए गए है। Stitch AI exactly यही बनाएगा।
Prompt लिखने का Formula जो में use करता हूं:
[App type] + [Mobile/Web] + [Theme: dark/light] +
[Main screen elements] + [Navigation style] + [Visual style]
मेरे कुछ Tested Prompts जो अच्छे Results देते हैं:
Budget Tracker App के लिए:
Design a personal expense tracker mobile app with light theme.
Dashboard should show a monthly spending donut chart at top,
below that a recent transactions list with category icons
and amount. Add a floating plus button at bottom right
to add new expenses. Clean and minimal design.
SaaS Dashboard के लिए:
Design a web-based project management dashboard.
Left sidebar with Home, Projects, Team, and Settings navigation.
Main area shows active project cards with progress bars.
Top right shows notification bell and user avatar.
Corporate and professional design style.
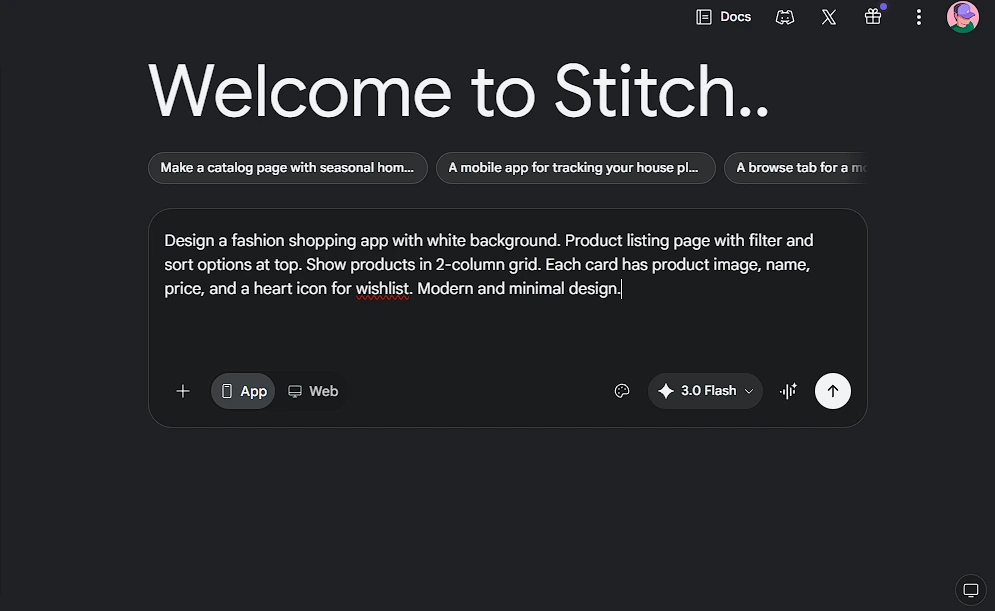
E-Commerce App के लिए:
Design a fashion shopping app with white background.
Product listing page with filter and sort options at top.
Show products in 2-column grid. Each card has product image,
name, price, and a heart icon for wishlist.
Modern and minimal design.
Step 3: सही Mode Select करो
Stitch में दो modes हैं और दोनों का use case अलग है।
Standard Mode (Gemini 3 Flash)
यह mode fast है। Text prompt देने पर 1 minute में result आता है। Figma export support करता है। अगर आप Beginners हो तो आपके लिए पहले यही perfect है। रोज के design exploration के लिए यही use करो।
Experimental Mode (Gemini 3.1 Pro)
यह mode मुझे थोड़ा slow लगा लेकिन इसकी quality better होती है। सबसे important feature यह है कि इसमें image upload होती है। यानी अगर आप एक rough sketch, wireframe, या किसी app का screenshot upload करो और Stitch उससे polished UI बना देगा। जब आपके पास visual reference हो तो यह mode use करो।
मेरी recommendation है कि idea explore करने के लिए Standard Mode से start करो। जब final design बनानी हो तो Experimental Mode try करो।
Step 4: Design Generate होने के बाद क्या करें
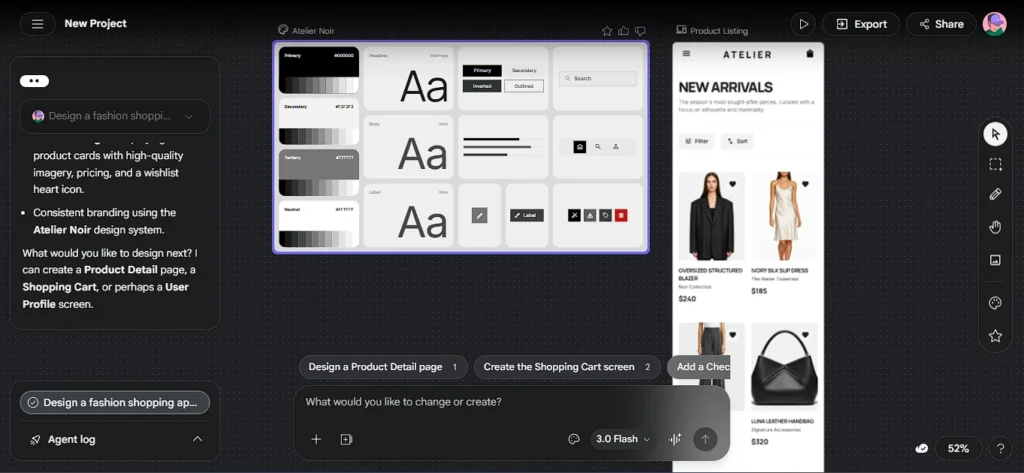
Design आने के बाद इसे directly accept मत करो। पहले यह check करो:
Review करो:
- Elements सही जगह हैं?
- Navigation logical है user के हिसाब से?
- Text readable है?
- Overall hierarchy clear है?
Refine करो: अगर कुछ miss हुआ या गलत लगा तो Stitch में chat के through update करो। यह feature बहुत काम आता है।
Refinement Prompts के Examples:
Move the search bar to the very top of the screen
Change background color to dark navy blue
Show product cards in a list view instead of grid
Make the heading font size larger
Voice Feature: March 2026 update में voice canvas आया है। अब आप directly बोलकर भी design update कर सकते हो। Small changes के लिए यह type करने से तेज है। मैं personally छोटे adjustments के लिए अब यही use करता हूं।
Step 5: Multiple Screens एक साथ बनाओ
यह Stitch का वो feature है जो इसे actually powerful बनाता है। पहले सिर्फ एक screen generate होती थी। लेकिन March 2026 के update के बाद एक prompt से 5 connected screens बन सकती हैं।
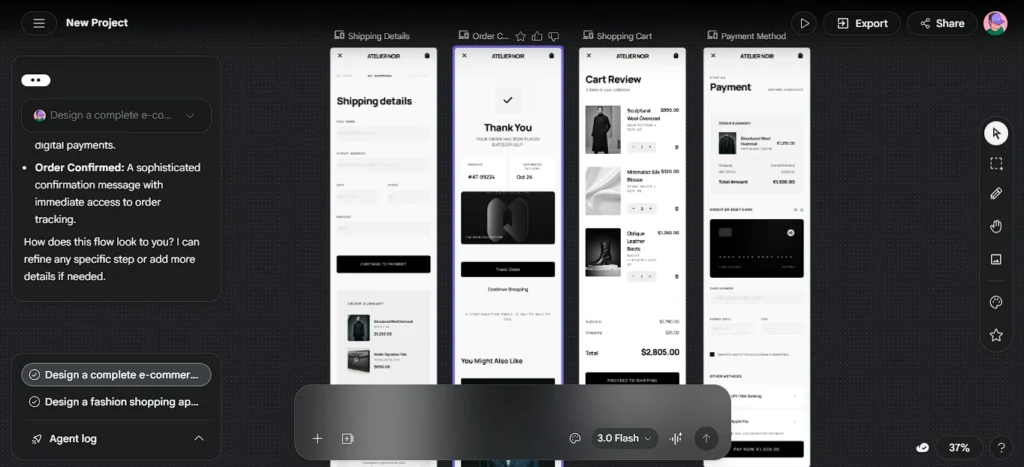
Example — Checkout Flow बनाना है:
Design a complete e-commerce checkout flow with 4 screens:
Screen 1: Cart review with item list, quantities, and total price
Screen 2: Shipping details form with name, address, pincode fields
Screen 3: Payment screen with card and UPI payment options
Screen 4: Order confirmation screen with order ID and tracking info
Keep design consistent across all screens.
Stitch 3 से 4 minutes में पूरा flow बना देगा। हर screen का color palette और typography consistent रहेगा।
यह feature investors को या clients को complete user journey दिखाने के लिए बहुत useful है।
Step 6: Interactive Prototype बनाओ
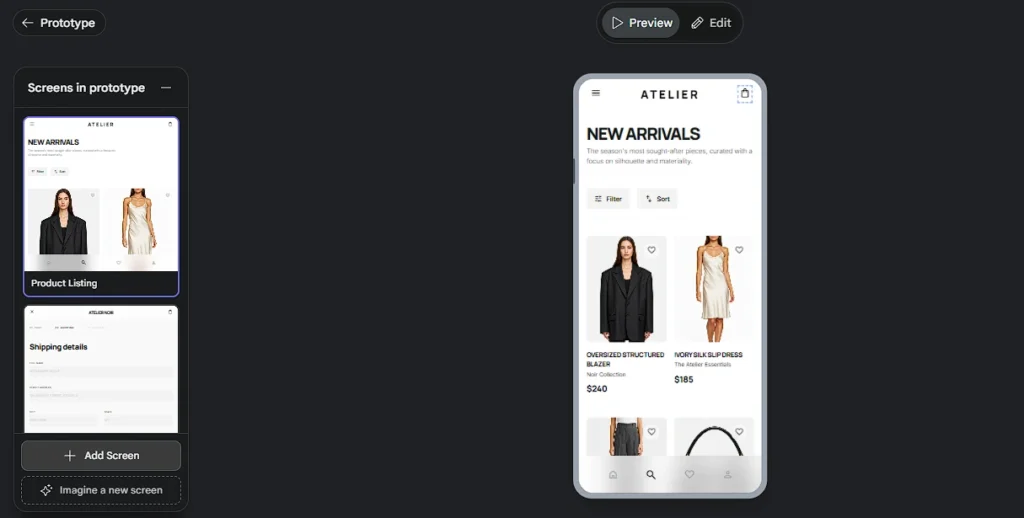
जब आपकी Screens बन जाएगी और आप उनको clickable बनाना चाहते हो तो ये steps follow करो।
- Canvas पर दो या ज्यादा screens select करो
- Top पर Generate का option show होगा उसपर click करके Instant Prototype पर click करो।
- Define करो कि किस button पर click होने पर कौनसी screen खुलेगी
- “Play” button दबाओ
- Clickable prototype ready है
Static mockup को एक real-feeling demo में convert करने के लिए यह feature genuinely बहुत useful है। Client presentation के लिए या user testing के लिए यह बहुत काम आता है।
Step 7: Design Export करो
Figma में Export करना है तो: Standard Mode में “Copy to Figma” button मिलता है। Click करो और directly Figma में editable layers के साथ paste हो जाएगा। Professional designers यहाँ से आगे polish कर सकते हैं।
Code चाहिए तो: Stitch clean HTML और CSS generate करता है। React format में भी export होता है। Simple pages के लिए यह code directly use हो सकता है। Complex interactions के लिए developer को manually adjust करना पड़ेगा।
सब कुछ एक साथ: ZIP download option भी है जिसमें सब assets और code एक साथ आता है।
Vibe Designing क्या है और यह Practically कैसे काम करता है?
Stitch ने “Vibe Design” का concept introduce किया है। Traditional design process में आपको हर छोटी चीज manually decide करनी होती है जैसे button का corner radius कितना होगा, padding 16px होगी या 24px, font कौनसा होगा।
Vibe designing में आप यह सब AI पर छोड़ते हो। आप सिर्फ यह बताते हो कि user को किस तरह feel होना चाहिए।
Example Prompt:
Design a meditation app that feels calm and peaceful.
Colors should be soothing. No clutter.
Minimal and breathable layout like Apple's apps.
Stitch इस description से automatically soft blues और greens, generous whitespace, rounded elements, और calm typography choose करेगा। आपने कोई technical specification नहीं दी फिर भी result professional लगेगा।
यह approach उन लोगों के लिए है जिन्हें design की technical knowledge नहीं है लेकिन वो clearly जानते हैं कि उनका product किस feel का होना चाहिए।
Stitch vs Figma vs Canva — कौन Use करें?
| Feature | Google Stitch | Figma | Canva |
|---|---|---|---|
| Free Plan | हाँ (limits के साथ) | हाँ (limited) | हाँ |
| Best For | App/Web UI prototype | Professional UI/UX | Graphics, Social posts |
| AI Generation | Core feature है | Add-on feature है | Basic AI है |
| Code Export | HTML/CSS/React | नहीं | नहीं |
| Learning Curve | Beginner friendly | Medium से High | बहुत Easy |
| Prototype | हाँ | हाँ | नहीं |
Simple Rule:
Social media posts, thumbnails, presentations बनाने हैं तो Canva use करो।
Professional UI/UX design जहाँ pixel-perfect control चाहिए तो Figma use करो।
App या website का quick mockup या MVP prototype बनाना है तो Google Stitch use करो।
यह तीनों tools compete नहीं कर रहे। तीनों अलग-अलग problem solve करते हैं।
Common Mistakes जो मैंने खुद की हैं
Mistake 1: Generic Prompt देना
शुरुआत में मैं भी “Generate the design of the Restaurant app” जैसे prompts देता था। Result तो आता था लेकिन मेरे idea से मेल नहीं खाता था। जब से मैं detailed prompts लिखने लगा, तब से output बहुत better हो गया। Prompt लिखने में 5 extra minutes invest करो और खुद देखो result में बहुत फर्क पड़ता है।
Mistake 2: First Result पर रुक जाना
पहला output starting point है, final design नहीं। Chat में feedback देते जाओ और 2 से 3 iterations में design काफी refined हो जाती है।
Mistake 3: Stitch को Canva की तरह Use करना
Google Stitch AI सिर्फ UI design के लिए है। App screens, dashboards, web pages इनके लिए use होता है ये AI। इससे poster या social media graphic बनाने की कोशिश मत करना। यह उसके लिए designed नहीं है।
Mistake 4: Export किए बिना Browser बंद करना
Monthly generation limits हैं। Design satisfying लगे तो immediately export करो। नहीं तो limit खर्च होती रहेगी और design खो सकती है।
Mistake 5: Voice Feature को Ignore करना
मैंने काफी समय तक voice feature use नहीं किया। जब try किया तो realize हुआ कि small changes के लिए यह genuinely faster है। “Make the header dark” बोलना type करने से तेज है।
किसके लिए Stitch सबसे Useful है?
Freelance Developers के लिए: Client को project start में quick UI mockup दिखाने के लिए perfect है। HTML/CSS export होता है तो directly development में use हो सकता है।
Startup Founders के लिए: Investors को idea visually present करना हो तो एक clickable prototype words से ज्यादा effective होता है।
Students के लिए: College projects और assignments के लिए professional-looking UI quickly बना सकते हो बिना Figma सीखे।
Content Creators के लिए: App review articles लिखते हो तो custom UI mockup बनाकर thumbnail या article में use कर सकते हो।
Product Managers के लिए: Sprint planning में team को new feature का design quickly दिखाने के लिए बहुत काम आता है।
FAQs
Q1. Google Stitch बिल्कुल free है क्या?
हाँ, April 2026 तक Google Stitch Google Labs के through completely free है। Standard Mode में 350 और Experimental Mode में 200 monthly generations मिलती हैं। Individual users के लिए यह sufficient है।
Q2. क्या Stitch से mobile app का design बन सकता है?
हाँ। Stitch mobile और web दोनों के लिए UI generate करता है। Prompt में “mobile app” clearly mention करो। Specific device dimensions भी add कर सकते हो जैसे iPhone 14 या Android।
Q3. Figma नहीं आता तो क्या Stitch use कर सकते हैं?
बिल्कुल। Stitch exactly उन लोगों के लिए बना है जिन्हें Figma नहीं आता। सिर्फ prompt लिखना आना चाहिए।
Q4. क्या Stitch Hindi prompts समझता है?
Basic Hindi prompts काम करते हैं। लेकिन English में ज्यादा accurate और detailed output आता है। Prompts English में लिखो और output design के text labels बाद में manually change कर सकते हो।
Q5. Exported code directly use हो सकता है?
Simple pages के लिए हाँ। Stitch का HTML/CSS clean होता है। Complex interactions और backend logic के लिए developer को manually काम करना पड़ेगा।
Q6. Stitch में team collaborate कर सकती है?
March 2026 update में Agent Manager आया है जिससे team members parallel design explore कर सकते हैं। Collaboration features अभी develop हो रहे हैं, Figma जितने advanced नहीं हैं।
Q7. क्या image upload करके design बना सकते हैं?
हाँ, Experimental Mode में। Rough sketch, wireframe, या किसी app का screenshot upload करो और Stitch उससे polished UI बना देगा।
Conclusion
Google Stitch AI से design बनाना अब designer background से होना इस चीज़ पर depend नहीं करता। यह एक prompt लिखने की skill है।
मैं यह नहीं कहूंगा कि Stitch AI perfect है। इसमें अभी भी Complex designs में manual adjustments करनी पड़ती हैं। Collaboration features भी अभी basic हैं। लेकिन जो यह करता है जैसे idea को quickly visual form देना, उसमें यह genuinely impressive है।
अगर आपके पास कोई app idea है जो अभी तक सिर्फ आपके mind में है तो आज Google Stitch AI पर जाओ, उसमें एक detailed prompt लिखो और देखो कि आपका idea screen पर कैसा दिखता है। पहली screen देखकर खुद decide करो कि यह आपके workflow में fit होता है या नहीं।
Design करने के लिए designer होना जरूरी नहीं है। अपना idea clearly describe करना आना चाहिए।
अगर आपने already is AI से कोई design बनाया है तो नीचे comments में जरूर बताए कि आपका experience कैसा था।
Disclaimer: इस article में जो भी information share की गई है वो latest है। Google Stitch अभी Google Labs का experimental product है इसलिए इसके features, pricing, और generation limits कभी भी change हो सकते हैं। अगर आप इस tool को seriously use करना चाहते हो तो एक बार stitch.withgoogle.com पर जाकर latest updates खुद check कर लो।
2 thoughts on “Google Stitch AI से Design कैसे बनाएं | Figma भूल जाओ, 1 Prompt में App UI Ready!”